Shopify Google Ads Enhanced Conversion Tracking (2023)
I needed to figure out how to do Google Ads conversion tracking for a Shopify client. I was not impressed by the other tutorials as each was missing something. I wanted to figure out the absolute PERFECT Google Ads conversion tracking setup for Shopify.
Quick solution #1 · Hire me
🔥 NOW ONLY $49 for Shopify Google Ads Enhanced Conversion Installation. Limited time only. 🔥
You just sit back. I’ll track Google Ads conversions for you. Record a video demo showing it’s working before you pay. Not happy? No payment.
I’m a freelance who does conversion tracking all day every day. If you want an easy solution 100% sure to work, tested and done for you, just get in touch @hire.
It usually takes under 1 hour, we can send a few WhatsApp messages and get the best conversion tracking setup for Shopify + Google Ads with 0 effort.
Quick solution #2 · Buy a prebuilt-setup & install with couple clicks
If you want a cheaper way, but still want to get an easy solution without doing all the complex setup, you can buy my Shopify Google Tag Manager Setup for Google Ads. You can simply import a readymade setup in a few clicks and have the best setup in a few minutes.
The hard way - DIY
If you’re more adventurous or perhaps a new store on a Shopify basic just trying out, here’s how you can DIY for Shopify Google Ads Conversions, still getting the Enhanced Conversions and a professional end result.
Best Shopify Google Ads Conversion Tracking Setup
My criteria for the absolute perfect Shopify Google Ads conversion tracking setup:
We want our Shopify and Google Ads to use the new more accurate Enhanced Conversion Tracking.
We want our Google Tag Manager Enhanced Conversion Tracking setup to 100% complete. We want Google Ads to know:
Email
Phone
First Name
Last Name
Address
Postal / Zip
Country
Region
City
Purchase value
Currency code
Transaction ID (Shopify Order Id) - to prevent duplicates
Use Google Tag Manager. It’s the industry standard professional tool. We do not want to have messy inline code all around. We want a visual, version controlled, labeled setup in a neat Google Tag Manager folder, using clearly named data layer variables
We want a Google Ads conversion setup we can test and debug visually using the new Google Tag Assistant
A lot of tutorials miss some of these parts. Most do not do the enhanced conversion tracking, or use outdated or unprofessional stuff like gtag, inline code snippets etc.
How to get the perfect Shopify Google Ads Conversion Setup?
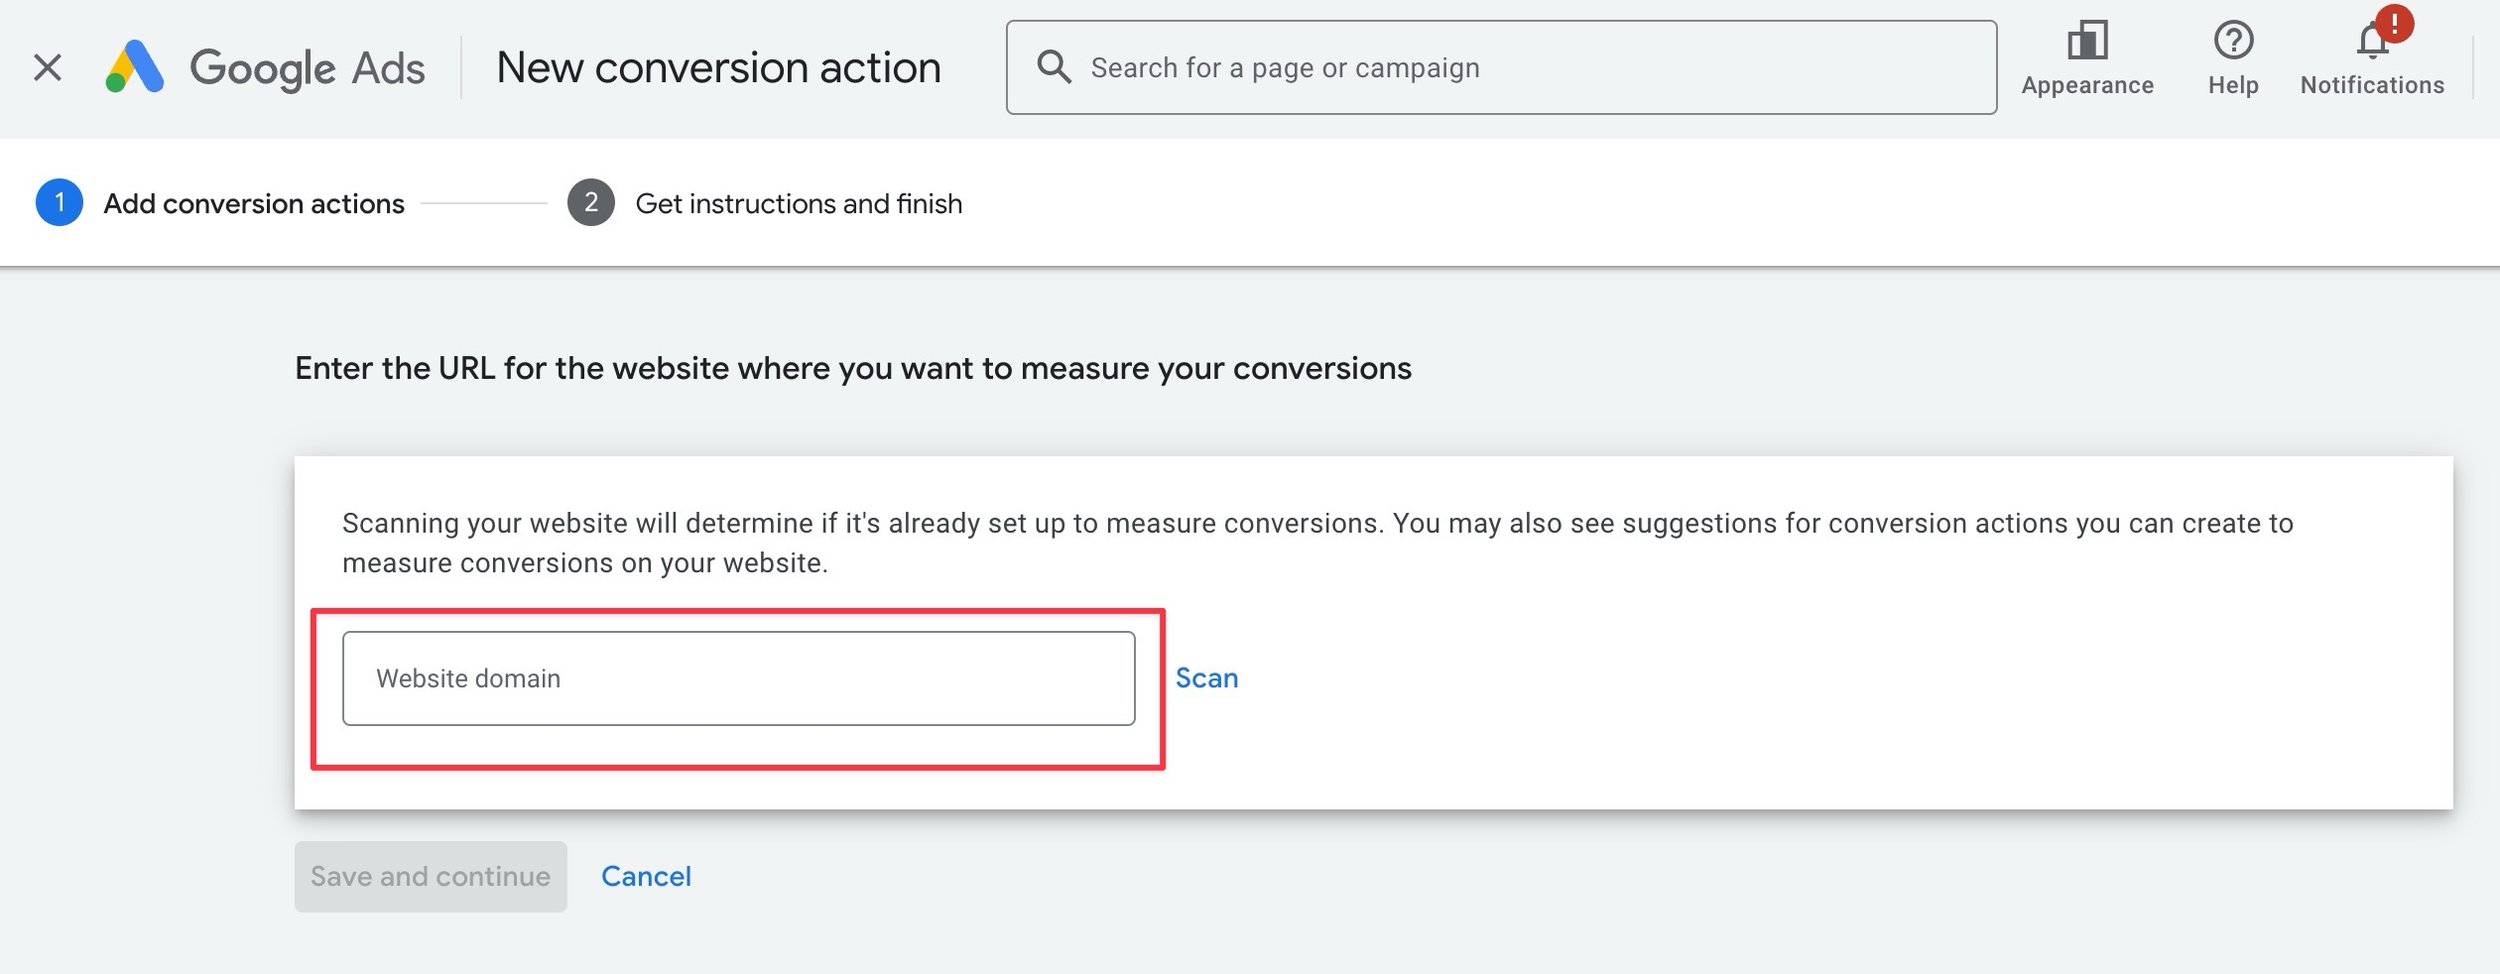
Creating a Shopify conversion inside Google Ads
Click the blue + New conversion action button
Select Website
You must scan your website. Ignore this and skip.
Click + Add a conversion action manually
Create your Google Ads conversion for Shopify purchases
Goal category for this action: Purchase
Conversion name: Shopify E-Commerce Purchase - Enhanced (via GTM)
Value: Use different values for each conversion
Enter a default value: 0
Count: Every (Recommended for purchases because every purchase is valuable)
Click-through conversion window: 90 days (or whatever you prefer)
Choose Google Ads View-through conversion window and Engaged-view conversion window for your Shopify purchase. I use default values.
Click “Save and continue” in the bottom
Grab the Google Ads conversion ID and conversion label for the Shopify purchase


Enabling Enhanced Conversions in Google Ads
Inside Google Ads, go to your new Conversion Shopify E-Commerce Purchase - Enhanced (via GTM) and scroll down to Enhanced Conversions.
Click “Turn on enhanced conversions”
how you want to set up enhanced conversions: Google tag or Google Tag Manager
Click Next
Again you must check the website.
Just make sure it’s enabled even if Google Ads says something about missing gtag or Google Tag Manager
Installing Google Tag Manager to Shopify
We’ll then continue with installing Google Tag Manager to Shopify.
Go to tagmanager.google.com
Create a new Google Tag Manager container
Copy the Google Tag Manager code
Add it to your Shopify by going to Themes -> Your theme -> edit code
Find the theme.liquid and paste your Google Tag Manager setup inside the <head> tag
Publish your your Shopify theme with Google Tag Manager installed


Next, I recommend going to Google Tag Manager and clicking preview to make sure Google Tag Manager is installed correctly and connects.

Next we’ll install Google Tag Manager and our data layer code to Shopify
checkout Order status page
Go to Shopify admin
Click Settings
Click Checkout
Scroll to Order status page
Find “Additional scripts” code field
Add Google Tag Manager there ( ! Yes, we must install Google Tag Manager here as well. The one from theme.liquid is not added to the Shopify Order Status Page)
Also add the following code below Google Tag Manager
<script>
  // Add Content Box with Order Details
/*
  Shopify.Checkout.OrderStatus.addContentBox(
    `<h2>Order Details</h2>
    <p>Order Number: {{ order_number }}</p>
    <p>Total Price: {{ total_price | money_without_currency }}</p>
    <p>Email: {{ email }}</p>
    <p>Phone: {{ phone }}</p>
    <p>Shipping Details:</p>
    <ul>
      <li>Name: {{ shipping_address.name }}</li>
      <li>Country: {{ shipping_address.country }}</li>
      <li>City: {{ shipping_address.city }}</li>
      <li>Province: {{ shipping_address.province }}</li>
      <li>First Name: {{ shipping_address.first_name }}</li>
      <li>Last Name: {{ shipping_address.last_name }}</li>
      <li>Phone: {{ shipping_address.phone }}</li>
      <li>Zip Postal: {{ shipping_address.zip }}</li>
    </ul>`
  );

*/
   // Push to dataLayer
  dataLayer.push({
    'event': 'shopifyOrderDetails',
    'email': '{{ email }}',
    'phone': '{{ shipping_address.phone }}',
    'firstName': '{{ shipping_address.first_name }}',
    'lastName': '{{ shipping_address.last_name }}',
    'street': '{{ shipping_address.address1 }}',
    'city': '{{ shipping_address.city }}',
    'region': '{{ shipping_address.province }}',
    'country': '{{ shipping_address.country }}',
    'postalCode': '{{ shipping_address.zip }}',
   // 'value': '{{ total_price | money_without_currency }}', //e.g. "1.348,95" - not ideal
    'value': '{{ total_price | divided_by: 100.0 | round: 2 }}', // e.g. "1348.95"
    'currencyCode': '{{ shop.currency }}',
    'orderId': '{{ order.id }}'
  });

</script>
Install The Conversion Linker tag to Google Tag Manager
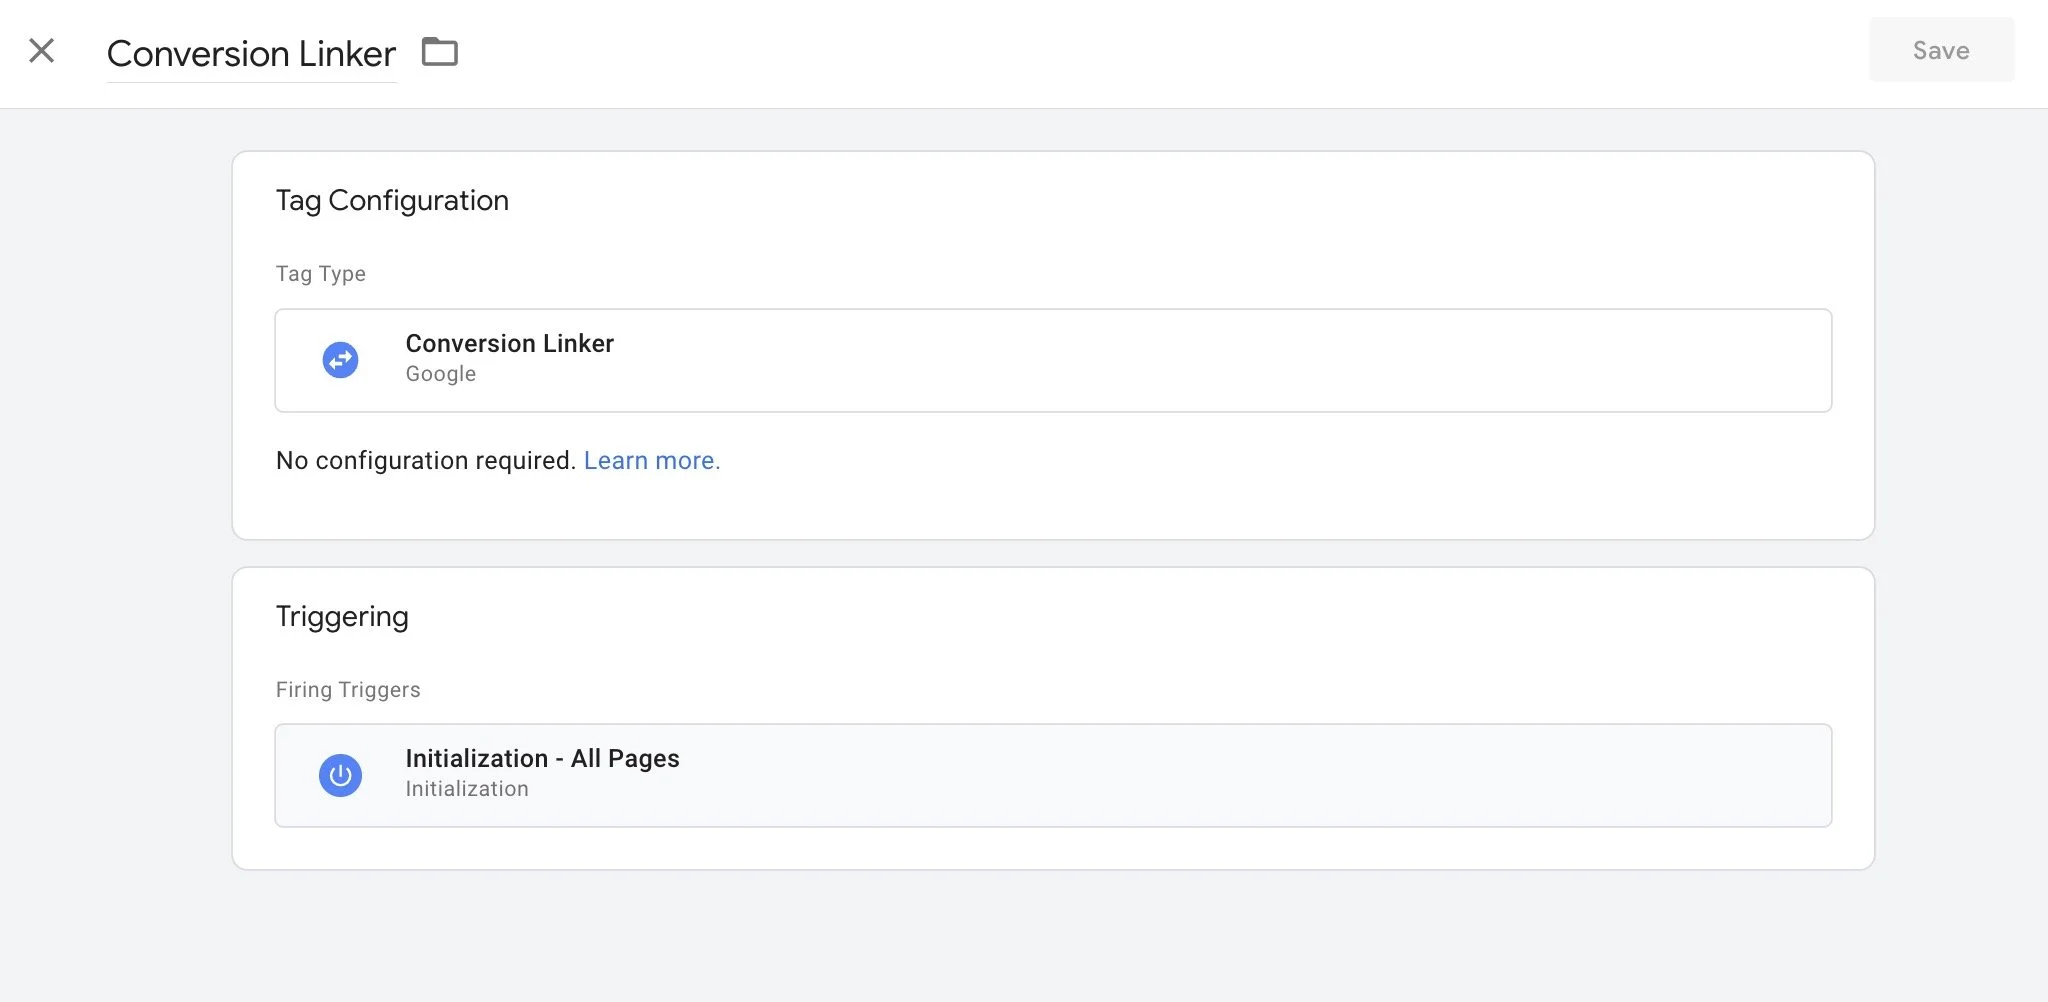
In Google Tag Manager, go to variables and create the matching data layer variables
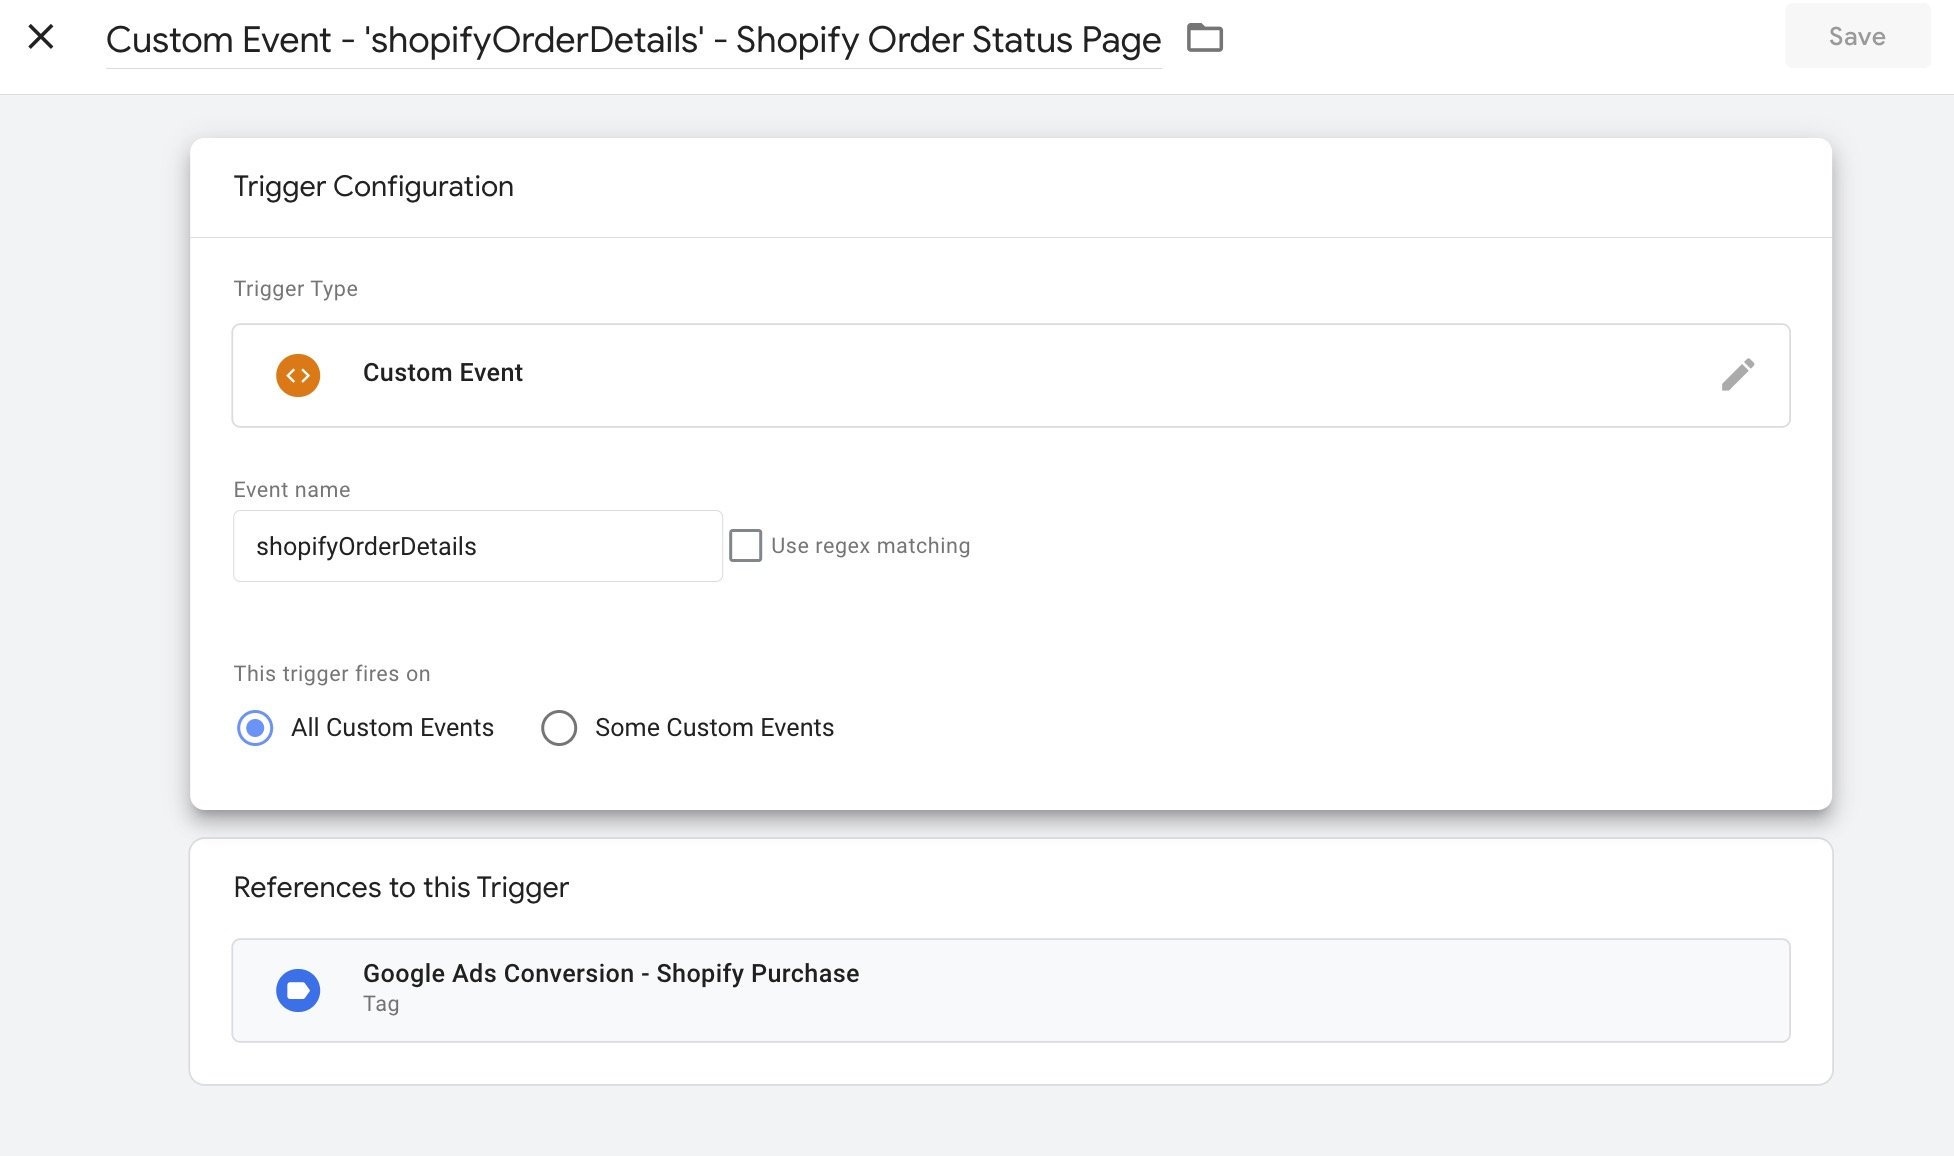
Create a custom event trigger for our Shopify Google Ad Conversion purchases.
You can call it Custom Event - 'shopifyOrderDetails' - Shopify Order Status Page
Use shopifyOrderDetails as the Event name
Create the Google Ads Conversion Tag inside Google tag Manager
For your Shopify Google Ads conversion, make sure to “check the Include user-provided data from your website” inside Google Tag Mager tag. This is what makes our Shopify Google Ads conversion “Enhanced Conversion”. We tell Google Ads all the information about the purchase and the person that did the purchase. Use the data layer variables to populate the User-Provided Data variable:
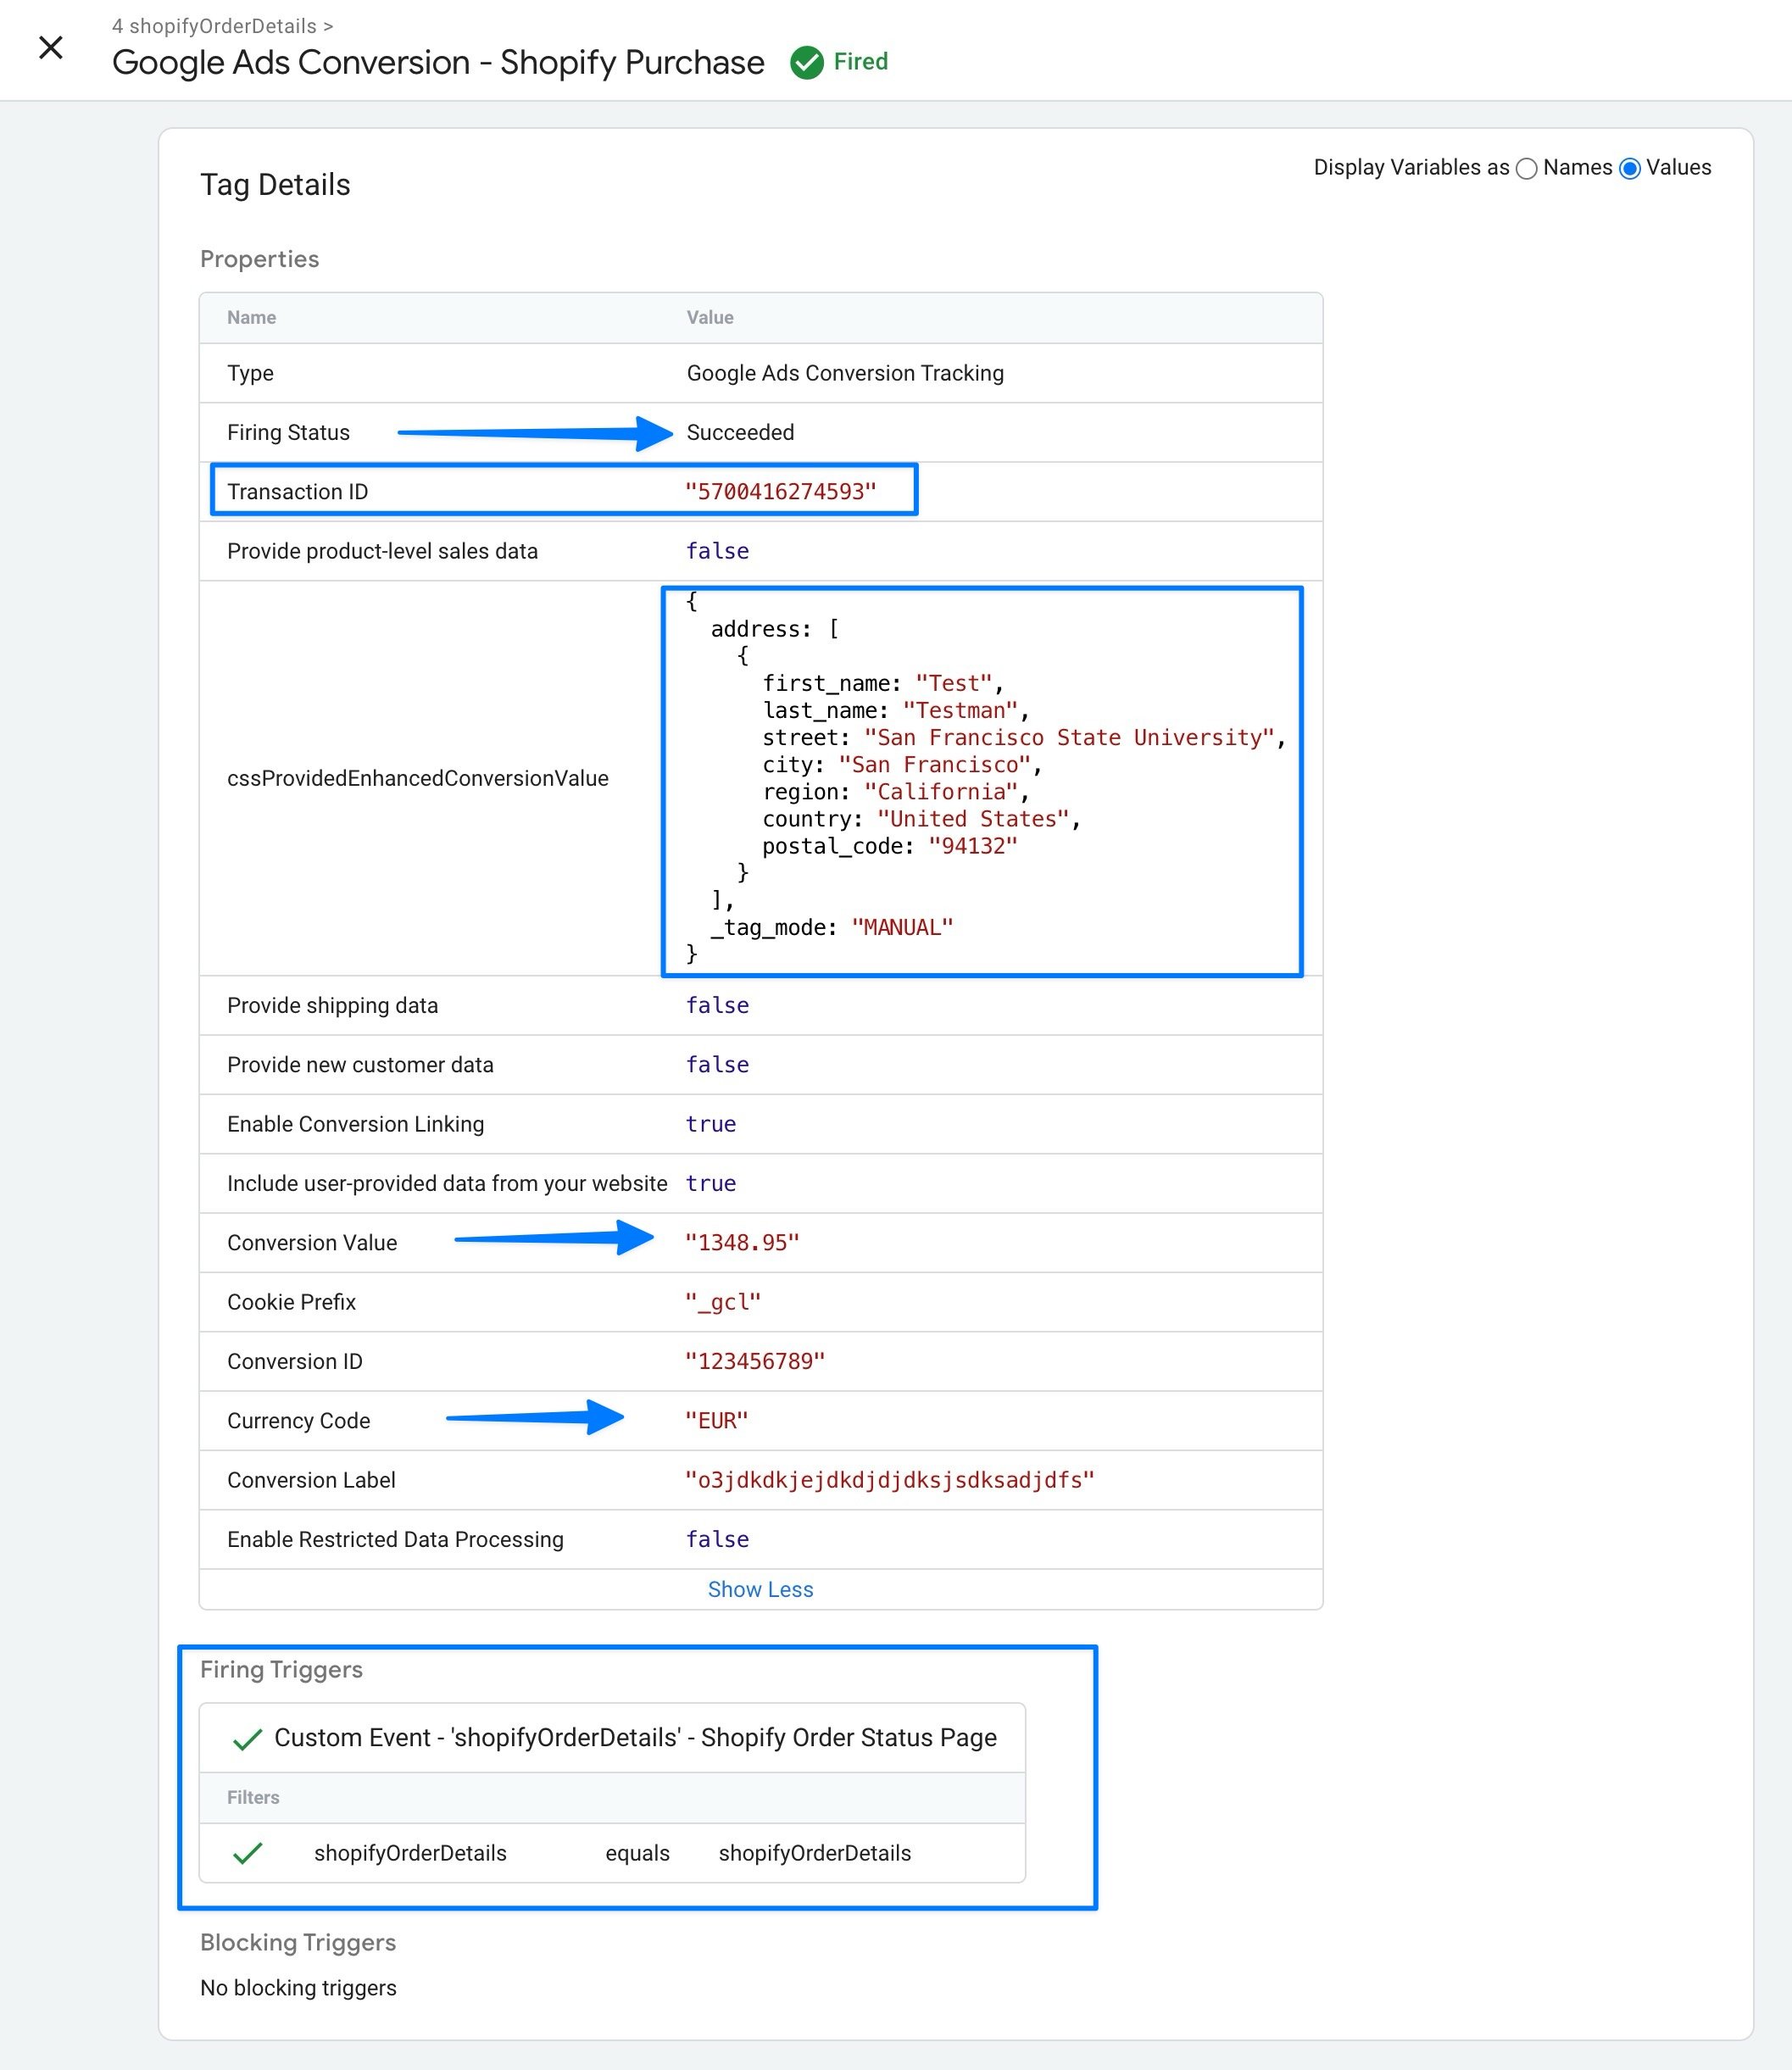
Next, click the Preview again in Google Tag Manager and make a test purchase. You can also make a test purchase and copy-paste your Order status page URL to the Google Tag Assistant preview URL.

Google Tag Assistant should now show your shopifyOrderDetails custom event trigger in the left side, and show
Tags Fired:
Google Ads Conversion - Shopify Purchase Google Ads Conversion Tracking - Succeeded

And clicking on the Google Ads Conversion - Shopify Purchase -tag should now show the following information, including Google Ads Transaction ID, Enhanced Conversion object (it’s weirdly called cssProvidedEnhancedConversionValue even if we don’t use CSS to get the enhanced conversion variables). Make sure you have currency code and conversion value also correctly.